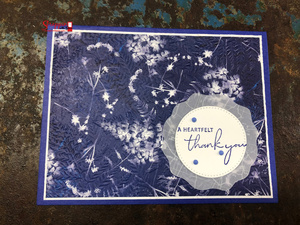
Embossed Sun Prints card

The Sun Prints papers are beautiful, but they go to the next level when you emboss them.
Card Base:
Cut Starry Sky card stock 8 ½ X 11 paper in half widthwise. You now have two pieces 8 ½ X 5 ½ Fold one of the pieces in half lengthwise for your card front. The card front now measures 4 ¼ X 5 ½.
Card Mat:
Cut Basic White card stock 4 X 5 ¼.
Card Front: Cut Sun Prints paper 3 ⅞ X 5 ⅛. I chose the print with ferns but there are other prints in the paper pack that will work as well.
Attach the Sun Prints card front to the Basic White card mat. Emboss this piece with the Fern Embossing folder. Attach the embossed card front to the Starry Sky card base.
Use the Stylish Shapes dies to cut the third smallest circle from Basic White card stock. Stamp sentiment from Nature’s Prints stamp set with Starry Sky ink on the die cut circle. There are three sentiments in this stamp set that will fit in the circle.
Use the Decorative Circle punch to punch a mat for the stamped circle from Layering Designs Vellum.
Attach the stamped circle to the center of the punch vellum circle and attach to the embossed card front. Add three embellishments to the stamped white circle from the 2022-2024 In Color Matte Decorative Dots.
That’s it; you have finished your card front. For the inside of your card, cut a piece of Basic White 4 X 5 ¼. Stamp a sentiment or write a note before attaching this piece inside your card.

If you want to cover your envelope flap to match your card, you can find directions here: http://www.scrappinwithjoni.com/blogs/covering-your-envelope-flap
 Starry Sky Classic Stampin' Pad
159212
Starry Sky Classic Stampin' Pad
159212
 Nature's Prints Cling Stamp Set (English)
158793
Nature's Prints Cling Stamp Set (English)
158793
 Sun Prints 12” X 12” (30.5 X 30.5 Cm) Designer Series Paper
158790
Sun Prints 12” X 12” (30.5 X 30.5 Cm) Designer Series Paper
158790
 Starry Sky 8 1/2" X 11" Cardstock
159263
Starry Sky 8 1/2" X 11" Cardstock
159263
 Basic White 8 1/2" X 11" Cardstock
159276
Basic White 8 1/2" X 11" Cardstock
159276
 Vellum 12" X 12" (30.5 X 30.5 Cm) Layering Designs
157764
Vellum 12" X 12" (30.5 X 30.5 Cm) Layering Designs
157764

 Decorative Circle Punch
159174
Decorative Circle Punch
159174

